

In 2023, DoorDash launched a number of item badges to help customers make more informed shopping decisions. These badges quickly became important engagement and conversion levers, but the process of building and deploying new badges was far from streamlined.
As we explored in Part 1, our team began this transformation by introducing the product knowledge graph, or PKG, to simplify the ingestion of data that powers our badges’ product tags. This laid the foundation for a scalable, high-velocity tagging system.
In this post, we’ll cover the second half of that journey: Building the badge serving framework, or BSF — the configuration-driven platform that makes it easy for developers to create, manage, and deliver badges for products across the DoorDash ecosystem.
Life before BSF
Before we created BSF, launching a new badge often meant writing custom logic across multiple parts of our codebase, wiring in one-off telemetry, and coordinating client updates. There was no standard contract for how badges were served or rendered; instead, each badge introduced new risk and overhead.
Some of the key issues we faced included:
- Code complexity: Badge logic was scattered across our feed service, which is responsible for generating content served on our consumer app. Most badges had business logic tightly coupled into serialization flows, making reusability a challenge.
- No prioritization system: Badge ranking was hard-coded or ad hoc, leading to inconsistencies across surfaces, including individual page types such as the homepage, grocery tab, or store page.
- No user interface (UI) standardization: While some badges were presented to the client as standard components, several were presented as strings or JSON blobs. Implementation between clients was inconsistent. This often meant that new badges required client changes, increasing the time for development and launch.
- Limited observability: Standard badges had some metrics, but custom or text badges required bespoke instrumentation or, worse, they had no metrics at all.
As the number of badge use cases grew — spanning multiple user interface components across standard badges, textual call-outs, and custom builds — it became clear we needed a more unified and scalable approach.
Defining the ideal state
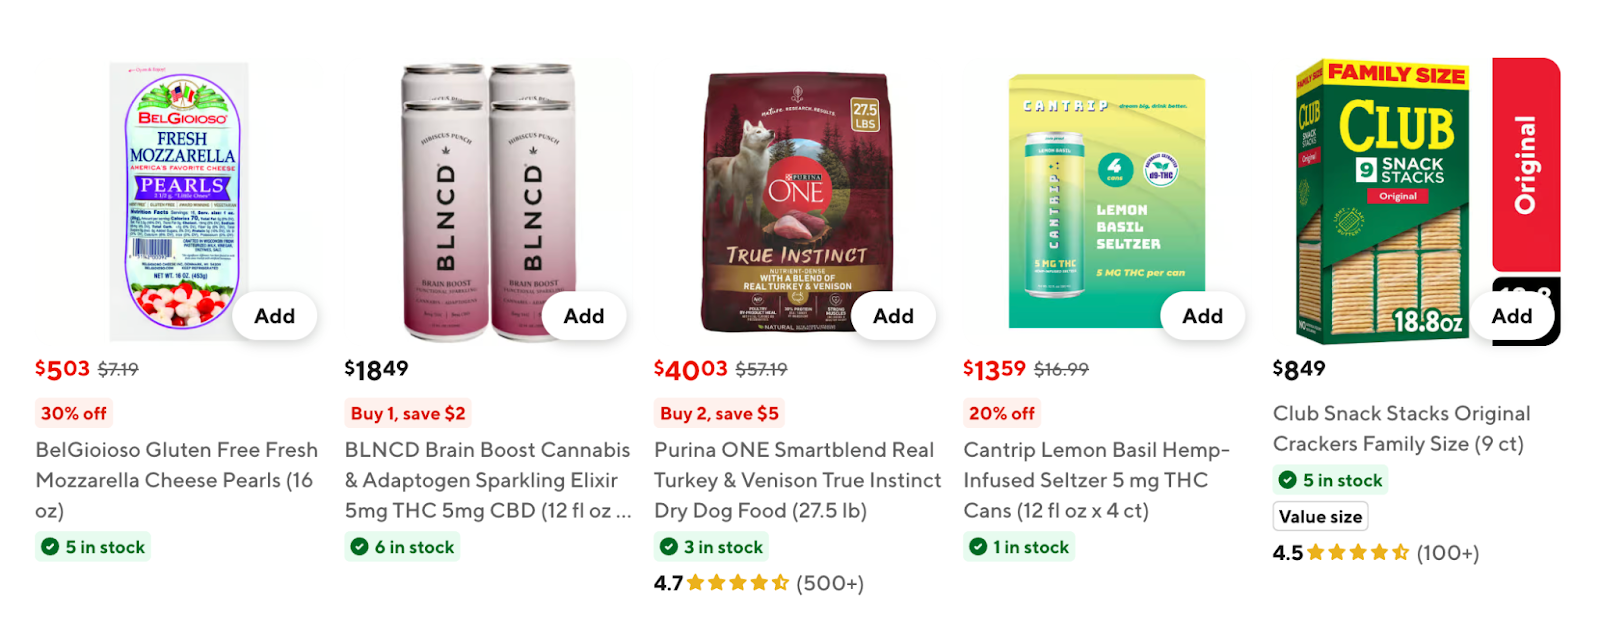
We wanted to build a framework that not only improved developer velocity but also ensured consistency and flexibility in decorating items with meaningful badges as shown in Figure 1. The ideal badge serving system needed to provide:
- Standardized interfaces: Only the data powering a badge should be included in business logic. The framework should handle the rest.
- Configuration-driven: Badges should be governed by config files that control style, placement, prioritization, and other badge metadata with no deployments required.
- Ease of experimentation: Defining treatment buckets and customizing badge variants should be configurable via declarative statements without requiring code changes.
- Write once, use everywhere: A badge should work across multiple platforms and surfaces without requiring code changes.
- Surface consistency: Similar UI components should show the same set of badges.
- Backend-driven: Clients should work with a unified badging contract that is fully driven by backend code. A code change on the client should only be required to visually render a brand-new badge component, never for placement or visibility.
With these principles in mind, we designed the badge serving framework, or BSF, to abstract complexity away from developers while still giving them fine-grained control through configuration.
Architecture overview
At a high level, BSF is made up of a few key abstractions:
- Badge processor: This is the entry point for badge generation. Individual pipelines in feed service generate content for a surface by calling the badge processor to apply all relevant badges to the items presented to the customer.
- Badge use cases: This logical representation of a badge in the backend is composed of a fetcher, a serializer, and a config file.
- Badge types: Similar badges, such as inventory, discovery, and affordability, are grouped to define shared rules, including ranking and display limits.
- Badge use case groups: These groups of configuration-driven badges within a type use product tags via the PKG ingestion pipeline, a default fetcher, and a default serializer without requiring new code.
- Configuration files: These control everything from badge visibility and style to experimentation and prioritization.
- Fetcher and serializer: These plug-and-play modules define how badge data is sourced and serialized.
By introducing these abstractions, we enabled a plug-and-play model that only requires developers to write the business logic for the badge and then wire it into the framework via configuration.
Stay Informed with Weekly Updates
Subscribe to our Engineering blog to get regular updates on all the coolest projects our team is working on
Please enter a valid email address.
Thank you for Subscribing!
How the badge serving framework works
BSF follows a structured, modular flow from input data to final badge output as shown in Figure 2. Here’s how the process works end-to-end.
Pipeline integration: The feed service is responsible for generating content for the item-discovery surfaces on the DoorDash Consumer app. The store page, category page, vertical landing page, and product detail page are some of the surfaces on which we show items to the consumer as item carousels or an item card grid.
- Each surface is powered by a specific pipeline in feed service. These individual pipelines are responsible for retrieving, decorating, and serializing the relevant items displayed on these surfaces.
- During the retrieval step, we only have limited metadata about the item. After retrieval, the pipeline applies a step called item hydration during which every item is richly decorated with product information. While most pipelines share the same item hydration code, some have custom hydration flows because of the specific product requirements of those surfaces.
- The badge processor is integrated into the core item hydration step, encapsulating it away from the individual pipelines. This ensures that item badging is consistently applied at the same step for all surfaces; all relevant data necessary for generating the badges is available post-hydration.
Badge discovery: The badge processor dynamically finds and loads all badge use cases during the dependency injection phase of starting feed service.
- Our runtime environment has a configuration file for every badge use case. The processor loads the config file and passes it to every use case for the badge generation step.
- The experimentation parameters are read here from the config file, enabling the processor to evaluate the badge use case to determine whether it is eligible for display to the customer.
Badge fetching: The processor invokes its fetcher for each eligible badge use case. This is the module responsible for determining which items qualify for the badge. The processor feeds hydrated items to the fetcher and then the core business logic for the badge use case is applied, filtering out ineligible items. After the fetchers for all badge use cases are run, the processor then has badge candidates at the item level. There are two types of fetchers:
- Default product tag fetcher: Developers can use this default fetcher to plug tags as-is into badges that can use product tags as the data source. The processor reads the tag information from the badge config file and passes it into the fetcher to filter out items ineligible for badging.
- Custom fetcher - Developers can create a customized fetcher for any badge that requires special business logic.
Badge ranking: Badge candidates are grouped by type, with each type using a ranker to prioritize and cap the badges shown.
- Most badges use BSF’s default ranker, which reads priorities from the config file. However, if any badge type requires custom ranking/capping, developers can create a custom ranker and plug that into the badge type.
- For example: The inventory badge type may generate more than one badge, including “Many in stock” or “20 in stock.” These are two different badge use cases, but we only want to display one to the customer. The badge type ranker ensures we’re prioritizing the correct badge for this type and discarding the rest.
Post-processing: After ranking badge types, the processor applies some final global rules.
- For example, it enforces badging rules to ensure we’re adhering to specific limits on the real estate available to us for a specific UI component (say, no more than five badges on the item card component).
- Conflict resolution — for instance, hiding Badge A if Badge B is present — is another example of post-processing.
Serialization: After the post-processing step is completed, the processor attaches the final set of badges at the item level. The hydration step is completed at this point and the pipeline continues to move on to the final step: serialization.
- During serialization, the pipeline’s serializer calls the badge serializer of each use case. The badge serializer, a pluggable module into the use case, defines how the badge should be presented on the UI.
- All badges are serialized into the standardized badge entry protobuf — a high-level abstraction for the various badge forms, including standard, textual, and custom (such as item ratings).
- The pipeline ultimately returns these badged items to the client.
Because all styling and logic live in config files, developers can change appearances and behaviors, or even run experiments without code changes or deployments.
Developer interfaces
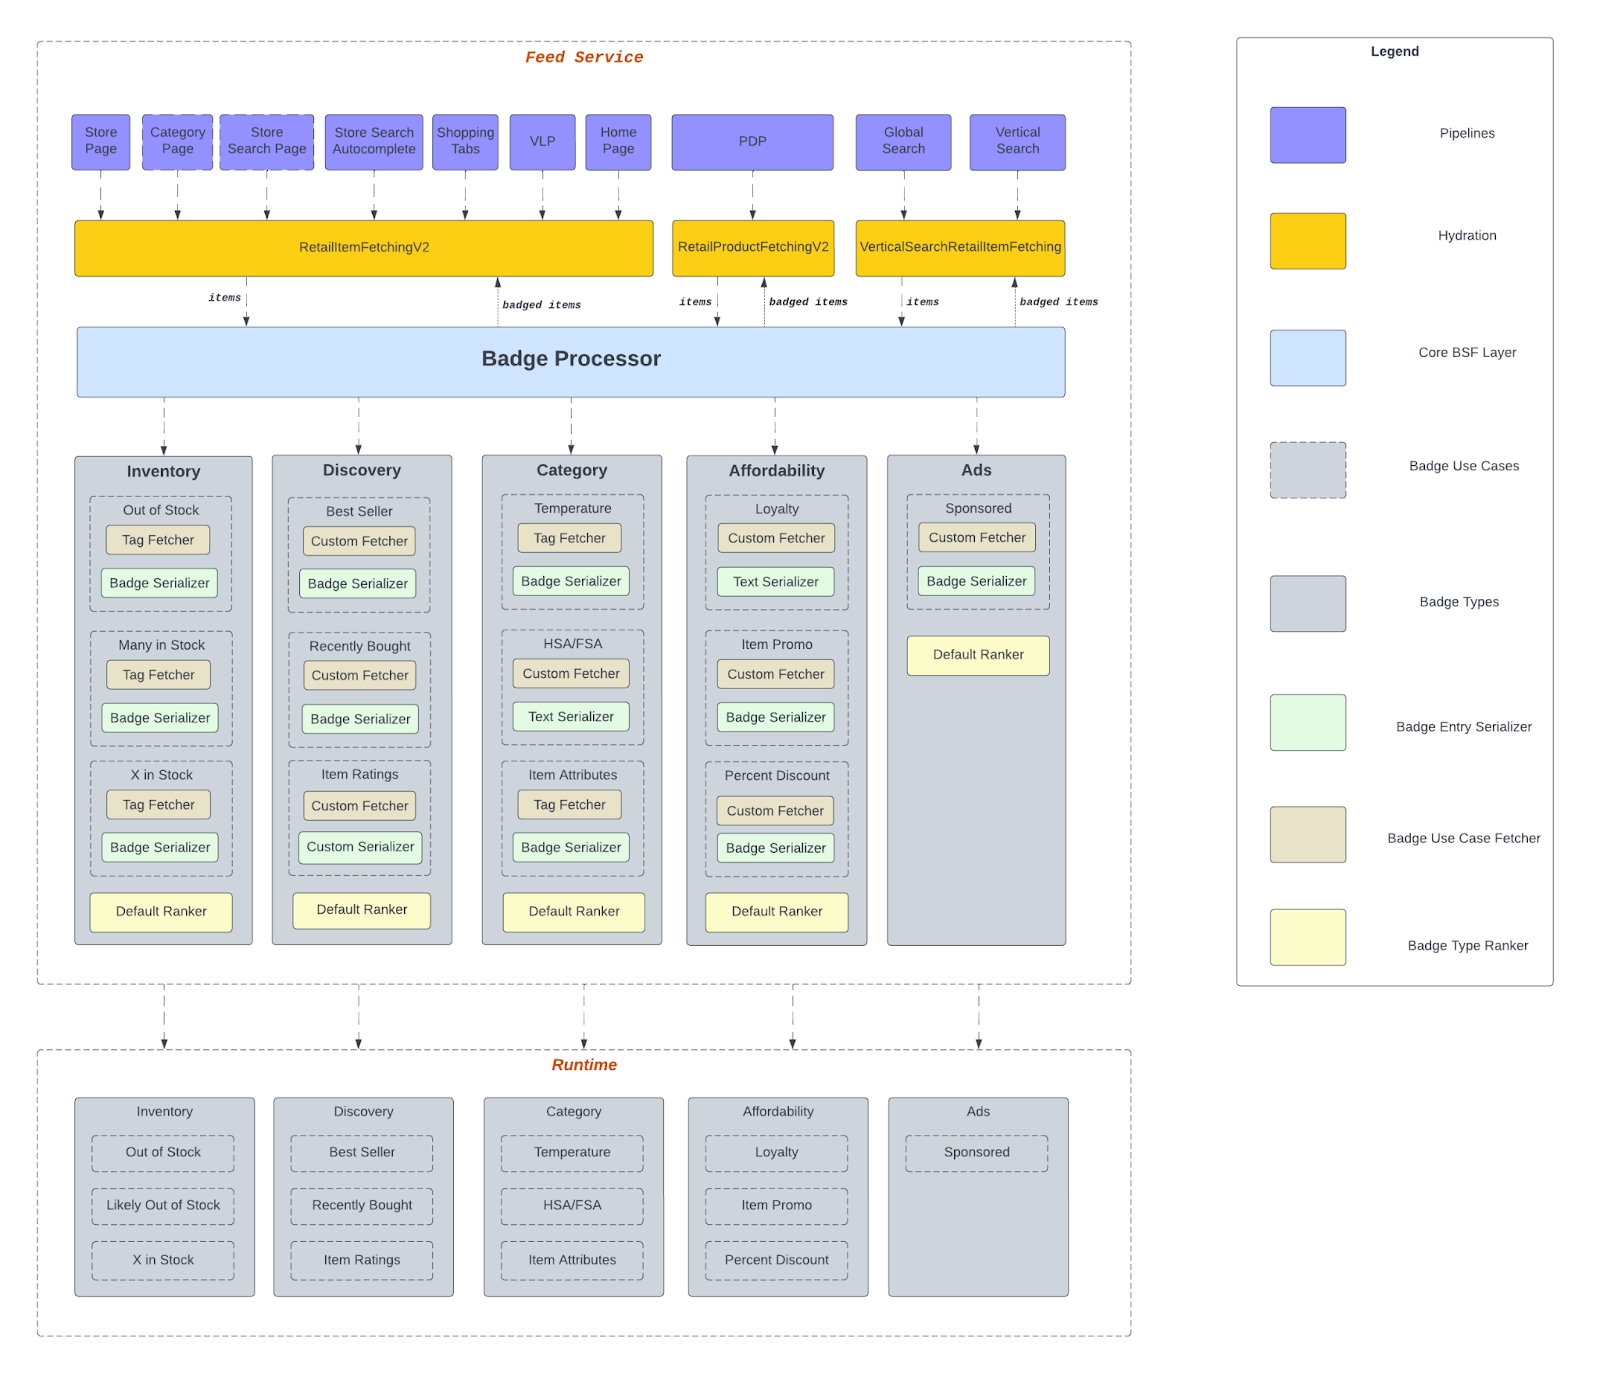
Sitting underneath the badge processor are multiple interfaces within BSF that provide a layer of abstraction for badge creation as shown in Figure 3. Developers interact with these interfaces to compose badges.

A badge is created by composing a badge use case, which defines the badge type, the fetcher implementing its business logic, and the serializer responsible for transforming it into the final UI representation. The table below outlines the role of each core interface:

BSF uses several key data classes to extensibly encapsulate and pass key data between jobs in the pipeline. These data classes are as follows:

Creating new badges in BSF
With BSF, developers can fully serve configuration-driven badges in one of two ways:
- Code-driven: This approach implements badges with custom business logic that have not yet been onboarded to the PKG ingestion pipeline.
- Product tags: This approach uses the PKG ingestion pipeline to implement badges via a one-time setup of lightweight Kotlin code. Any brand-new badge created within this setup requires only a configuration change without any code changes.
Code-driven badges
Developers who wish to create badges without integrating with the PKG ingestion pipeline can do so through the following steps:
Step 1: Determine the BadgeType to which the new badge should belong
If the BadgeType does not yet exist, implement it. To implement a new BadgeType:
- Implement a BadgeTypeRanker. The BadgeTypeRanker determines how all badges within a BadgeType for a single item are ranked.
- If the BadgeType does not have any special ranking needs, we offer a DefaultBadgeTypeRanker, which ranks all badges by their configuration-defined priority as shown here:
class DefaultBadgeTypeRanker : BadgeTypeRanker {
  override suspend fun rank(
      badgesByItem: Map<GroceryItem, List<BadgeEntry>>,
  ): Map<GroceryItem, List<BadgeEntry>> {       // Sort badges by their priority specified in their config files.
      return badgesByItem.mapValues {
          it.value.sortedBy { badgeEntry ->
              badgeEntry.metadata.priority
          }
      }
  }
}- If, however, the BadgeType has unique ranking needs, implement a custom BadgeTypeRanker. For example, if we want to personalize how certain badges are ranked by customer preferences, then we put the business logic for that in a new class that implements the BadgeTypeRanker.
- Define the BadgeType and plug in the applicable BadgeTypeRanker. Below is an example of the RatingsBadgeType using the DefaultBadgeTypeRanker:
class RatingsBadgeType(
  override val ranker: DefaultBadgeTypeRanker,
) : BaseBadgeType(retailBadgeExperimentManager) {   // We use the slug to determine which config file name corresponds to this BadgeType.
  override val slug = NAME

  companion object {
      const val NAME = "ratings"
  }
}- Create a configuration file for the new BadgeType. Here we specify the config parameters for badges in this type across the different surfaces. The following is an example configuration for a RatingsBadgeType:
{  // Each badge surface has its own config with unique priorities, limits, etc.
  "badge_surfaces": [
    {
      "badge_surface": "item_card",
      "content": {
        "display_mode_options": {
          "default":  {
            "metadata": {
              "priority": 30,
              "sort_order": 30,
              "limit": 1,
              "badge_location": "item_description"
            }
          }
        }
      }
    },
    {
      "badge_surface": "product_details_page",
      "content": {
         "display_mode_options": {
           "default":  {
             "metadata": {
               "priority": 30,
               "sort_order": 30,
               "limit": 1,
               "badge_location": "product_details_item_info"
             }
           }
         }
       }
    }  ]
}
Step 2: Create a BadgeUseCaseFetcher for the new badge.
The fetcher is responsible for determining which items get the badge and providing the data needed to serialize it later in the pipeline.
- First, determine the badge’s serialization requirements. This determines what the BadgeUseCaseFetcher should return. If the badge does not fit into the definition of a StandardBadge or TextBadge, implement a RetailItemCustomBadge to contain the details necessary to serialize the badge later in the pipeline. Here is an example of an ItemRatings custom badge:
data class ItemRatings(
  // Contains the number of ratings and reviews that need to be passed to
  // clients in order to render the badge
  val ratingsAndReviews: RatingsAndReviews,
) : RetailItemCustomBadge()- Implement the BadgeUseCaseFetcher to return a BadgeCandidate for every item that should get it. For example, the following RatingsBadgeUseCaseFetcher creates a BadgeCandidate with the ItemRatingsCustomBadge whenever an item has at least 10 reviews:
class RatingBadgeUseCaseFetcher : BadgeUseCaseFetcher {
  override suspend fun fetch(context: BadgeContext, entityRef: BadgeFetchingEntityRef): List<BadgeCandidate> {
      return entityRef.items.mapNotNull { item ->
          val numberOfRatings = item.ratingsAndReviews?.numberOfRatings
          // Only show ratings if we have at least 10 reviews
          if (numberOfRatings >= 10) {
              item.ratingsAndReviews?.let { it ->
                  BadgeCandidate(
                      item = item,
                      entity = BadgeCandidateEntity.CustomBadgeCandidateEntity(
                          badge = RetailItemCustomBadge.ItemRatings(
                              ratingsAndReviews = it,
                          ),
                      ),
                  )
              }
          } else {
              null
          }
      }
  }
}
Step 3: Create a BadgeUseCaseSerializer for the badge.
This is responsible for serializing the badge’s backend definition into the proto contract that clients understand.
- If the badge needs to serialize just text, text styling, background color, supported icons, or size, developers can plug in a DefaultStandardBadgeUseCaseSerializer that looks like this:
object DefaultStandardBadgeUseCaseSerializer : BadgeUseCaseSerializer {
  override fun serialize(badgeEntry: BadgeEntry): ProtoBadgeEntry {
      return when (val entity = badgeEntry.entity) {
          is BadgeEntryEntity.StandardBadgeEntryEntity -> {
              ProtoBadgeEntry.newBuilder().apply {
                  standard = StandardBadgesEntry.newBuilder().addAllBadges(
                      entity.badges.map { it.toProtoBadge() },
                  ).build()
              }.build()
          }
          else -> {
              throw IllegalArgumentException("Unsupported badge entry entity : $entity")
          }
      }
  }

  fun RetailItemStandardBadge.toProtoBadge(): Badge {
      val badge = this
      return Badge.newBuilder().apply {
          text = badge.text.toProtoStringValue()
          backgroundColor = badge.backgroundColor.toProtoStringValue()
          badgeSize = badge.badgeSize.toProtoStringValue()
          badgeStyle = badge.badgeStyle.toProtoStringValue()
          leadingIcon = badge.leadingIcon.toProtoStringValue()
          badge.leadingIconSize?.let { leadingIconSize = it.toProtoUInt32Value() }
          trailingIcon = badge.trailingIcon.toProtoStringValue()
          badge.trailingIconSize?.let { trailingIconSize = it.toProtoUInt32Value() }
          textStyle = badge.textStyle.toProtoStringValue()
      }.build()
  }
}- For standard text badges that only need to serialize text and text styling, we offer a DefaultTextBadgeUseCaseSerializer that looks like this:
object DefaultTextBadgeUseCaseSerializer : BadgeUseCaseSerializer {
  override fun serialize(badgeEntry: BadgeEntry): ProtoBadgeEntry {
      return when (val entity = badgeEntry.entity) {
          is BadgeEntryEntity.TextBadgeEntryEntity -> {
              ProtoBadgeEntry.newBuilder().apply {
                  text = TextEntry.newBuilder().apply {
                      text = entity.text.toProtoStringValue()
                      textStyle = Typography.Value.valueOf(entity.textStyle.uppercase())
                      textColor = Color.Value.valueOf(entity.textColor.uppercase())
                      maxLines = entity.maxLines.toProtoInt32Value()
                  }.build()
              }.build()
          }
          else -> {
              throw IllegalArgumentException("Unsupported badge entry entity : $entity")
          }
      }
  }
}- If the badge has a non-standard serialization use case, create a custom serializer. For example, RatingsBadgeUseCaseSerializer sets the average rating as well as number of reviews and ratings for the client to render the badge as shown here:
object RatingBadgeUseCaseSerializer : BadgeUseCaseSerializer {
   override fun serialize(badgeEntry: BadgeEntry): ProtoBadgeEntry {
       val ratingsBuilder = Ratings.newBuilder()
       val ratingsAndReviews = badgeEntry.itemRatings.ratingsAndReviews
       ratingsAndReviews.averageRating?.let { average ->
           ratingsBuilder
               .setAverage(average.toFloat())
               .setCountOfRatings(ratingsAndReviews.numberOfRatings)
               .setCountOfReviews(ratingsAndReviews.numberOfReviews)
       }
       return ratingsBuilder.build()
   }
}
Step 4: Implement the BadgeUseCase to plug in the BadgeType, BadgeUseCaseFetcher, and BadgeUseCaseSerializer
Compose the BadgeUseCase by plugging in the relevant implementation classes of the badge type, the fetcher, the serializer, and a pointer to the config file. Here is an example:
class RatingBadgeUseCase(
  retailBadgeExperimentManager: RetailBadgeExperimentManager,
  override val badgeType: RatingsBadgeType,
  override val fetcher: RatingBadgeUseCaseFetcher,
  override val serializer: RatingBadgeUseCaseSerializer,
) : BaseBadgeUseCase(retailBadgeExperimentManager) {
        // We use the slug to determine which config file name corresponds to this
        //BadgeUseCase.
  override val slug = NAME

  companion object {
      const val NAME = "item_ratings"
  }
}
Step 5: Create a configuration file for the new badge
Here, we specify the parameters that define the badge’s display characteristics as well as which surfaces we want it to appear on. The following is a sample configuration for a RatingsBadgeUseCase:
{
  "content": {
    "display_mode": "experiment",
    "display_mode_options": {      // Experimentation fields. We only display this badge when in the treatment for the          // bsf_enable_rating_badge experiment.
      "experiment": {
        "name": "bsf_enable_rating_badge",
        "variations": [
          {
            "variants": ["treatment"],
            "metadata": {
              "priority": 1
            }
          }
        ]
      }
    }
  },
  "badge_surfaces": [
    {
      "badge_surface": "item_card"
    },
    {
      "badge_surface": "product_details_page"
    }
  ]
PKG product tags-driven badges
Through BSF, developers can also use the PKG ingestion pipeline to create new badges with little to no code changes. Once it’s been confirmed that items are being correctly tagged, developers can serve a new badge through the following steps:
- Follow step 1 in the code-driven badges section above to determine and implement the expected badge type.
- If no BadgeUseCaseGroup for the badge type exists in the framework, implement one.
Here is some sample code for an InventoryBadgeUseCaseGroup:
class InventoryBadgeUseCaseGroup(
  override val badgeType: InventoryBadgeType,
  override val fetcher: DefaultTagFetcher,
) : StandardBadgeUseCaseGroup() {
  companion object {
      const val NAME = "inventory_tags"
  }
  // We use the slug to determine which config file name corresponds to this BadgeUseCaseGroup.
  override val slug = NAME
}
Badge use case groups within a badge type are defined in the runtime platform, which provides configuration data to BSF. Each group has a corresponding class implementation in the framework. Similar to how a BadgeUseCase is composed, here we compose a BadgeUseCaseGroup by plugging in the relevant badge type and a fetcher. For all badges within a group, BSF provides a DefaultTagsFetcher implementation to determine which items should receive the badge. This is done by checking the product tags for each item to determine whether they match the product tag in the badge’s configuration file. Here is a DefaultTagsFetcher implementation:
class DefaultTagFetcher : BadgeUseCaseFetcher {
  override suspend fun fetch(      context: BadgeContext,       entityRef: BadgeFetchingEntityRef   ): List<BadgeCandidate> {       // entityRef.fetchingProductTag is retrieved from the config for this badge.
      return entityRef.fetchingProductTag?.let { fetchingTag ->
          entityRef.items.mapNotNull { item ->
              item.productTags?.let { itemProductTags ->
                  // Find the matching item product tag for the specified values in the config.
                  itemProductTags.firstOrNull { it.tagType == fetchingTag.productTagType }?.let {
                      it.tagValues.find { tagValue -> tagValue.tagId == fetchingTag.productTagId }
                  }?.let {
                      BadgeCandidate(
                          item = item,
                          entity = BadgeCandidateEntity.StandardBadgeCandidateEntity(),
                      )
                  }
              }
          }
      } ?: emptyList()
  }
}- Update or create a BadgeUseCaseGroup configuration file. This is a sample configuration for an InventoryBadgeUseCaseGroup:
{
  "name": "inventory_tags",  // List of fully configuration-driven badges of InventoryBadgeType
  "badges": [
    "x_in_stock", "verified_in_stock"
  ]
}- Create a BadgeUseCase configuration file. This is a sample configuration for an inventory x_in_stock badge use case:
{
  "content": {    // This badge is driven by this product tag that was ingested into PKG for items. When an item     // has this product tag, it will get the x_in_stock badge.
    "product_tag": {
      "tag_type": "stock_level",
      "tag_id": "x_in_stock"
    },
    "display_mode": "experiment",
    "display_mode_options": {      // Experimentation fields. We only display this badge when in the treatment for the          // bsf_enable_x_in_stock experiment.
      "experiment": {
        "name": "bsf_enable_x_in_stock",
        "variations": [
          {
            "variants": ["treatment"],
            "metadata": {
              "text": "{display_quantity} in stock",
              "placement": "flexible_item.descriptor",
              "priority": 30,
              "dls_tag_style": "subdued",
              "background_color": "RED",
              "leading_icon": "check/circle/fill",
              "leading_icon_size": 16
            }
          }
        ]
      }
    }
  },  // Since each badgeSurface does not specify its own content, the default above is what is used.
  "badge_surfaces": [
    {
      "badge_surface": "item_card"
    },
    {
      "badge_surface": "product_details_page"
    }
  ]
}
With this process, every new badge under an existing BadgeType and BadgeUseCaseGroup only needs to add the badge’s configuration file and add its name to the BadgeUseCaseGroup configuration. This means no new code needs to be added or deployed. BSF will dynamically generate the badge use case within the badge processor and serve these badges to the client.
Results
Since launching BSF, we have migrated all existing item-level badges to this new framework. We’ve seen strong wins in both developer velocity and product flexibility in the new badge use cases that were unlocked across our new verticals stack, including:
- Faster badge launches: New badges go live in minutes, not weeks
- More experimentation: Product teams can test ideas without needing backend changes
- Better consistency: Unified rendering logic across platforms and surfaces streamlines processes
- Improved observability: Badge impressions and quality metrics are now standardized
As we continue to expand the badging ecosystem, BSF sets us up for long-term scalability. Whether it’s introducing new badge types to the hierarchy, more complex ranking logic, or even a new serialization type, we now have a solid foundation that balances flexibility with maintainability. By abstracting complexity, standardizing interfaces, investing in configuration-driven systems, and integrating with PKG product tags, we’ve created end-to-end tooling that empowers teams to move faster without compromising on quality or consistency.

